
All training providers must physically see their students perform the tasks as required by the qualification training package. Primarily we do this via live zoom assessments, however we also have the option to use video assessments. This allows us to keep course fees lower. Alternatively, you can arrange for a Educator to visit you, however, this does attract additional fees.
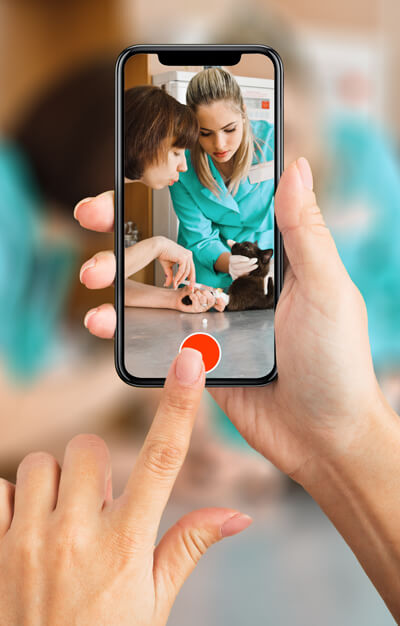
Every practical assessment has full instructions on what needs to be included. We do not require anything fancy for you to record, just using a smartphone is fine. Most computers come with basic video editing software if you need it.
An Educator will assess your video and provided feedback. This feedback will help you learn further as well as let you know how you did. Sometimes, instead of resubmitting a video, we may also give you a phone call to bridge the gaps in your video.
No need to be nervous, these videos can be relaxed and should be a bit of fun. We don't mind if you leave little bloopers in there.
Sample Student Video
Watch this sample student video assessment.
FREQUENTLY ASKED QUESTIONS
HOW TO RECORD A VIDEO?
You do not need any fancy cameras etc to take your videos, utilising a smart phone is fine.
You do however need to ensure that you follow these points to enable us to accept your video submissions.
- Every video must start with us being able to see your face and you must introduce yourself and state what video it is you are recording.
- If you need to zoom in close, please ensure you pan in to what you need. Do not stop and restart recording as we need to verify it is still you.
- If you do stop a recording, just when you restart, show us your face and then pan down again.
- We must be able to clearly hear you and what you are saying. If there is excessive background noise we may not be able to accept the video. Try to not film outdoors as the wind noise will often block you out.
- If a video requires you to interact with another person, we need to see them in the frame. Make sure they are OK with this.
- If you need to edit your video for any reason, e.g. cut out a blooper, we need to see your face where it resumes. It is OK to leave bloopers in, we especially love those that give us a giggle.
CAN I RECORD A VIDEO AT HOME?
Some videos can be performed at home, as long as you have the right equipment and pets. Check the video instructions in your Placement Area (in the Learning Centre) for details on those you can do at home.
HOW TO EDIT VIDEO ON MAC
Your Mac operating system comes with a simple video editor called 'iMovie'. This is more than enough to edit your videos if you need to shorten them, add in a new section, cut out a blooper etc. Here's a quick video showing you the basics, and below that, a longer video if you want to learn how to add titles etc.
HOW TO EDIT YOUR VIDEO ON WINDOWS
If you are on a Windows computer you will need a video editing software. There are plenty of paid and free options to choose from.
Keep in mind you need something simple that you can learn quickly in order to do a few easy edits. You are not producing a blockbuster movie, so avoid overcomplicated software that will slow down your computer.
We suggest checking out the following options. They are free to download and use, and have extensive user guides and/or tutorials to help you get started.
HOW TO EDIT YOUR VIDEO ONLINE
If you don't want to download any video editing software on your computer, you can try an online video editor that allows you to cut your video right in your browser.
Have a look at these:
WHERE TO UPLOAD YOUR VIDEOS
To save on server space, we require you to upload your video assessment to YouTube as a private video and then submit the link to view via the Learning Centre. You can see more details on how to do this in the question below.
Rest assured, as long as you follow our steps and make your video private, the general public will be unable to watch your video online.
HOW TO UPLOAD YOUR VIDEO TO YOUTUBE & THE LEARNING CENTRE
Uploading To YouTube
- Log in using your student email account.
- Click the small grey camera icon on the top right of the screen and then select Upload Video.
- Select your file to upload by clicking the words “select file to upload OR drop the file using the click, drag and drop method into the box. Let the file upload.
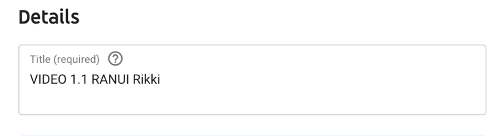
- Name your file appropriately in the Title section. Ensure it is labelled “VIDEO 1.1 SURNAME Firstname” Where 1.1 is the video number (from the instructions) and the attempt number.
- Under Audience select no it’s not made for kids then select next.
- Select Next for Video elements and checks.
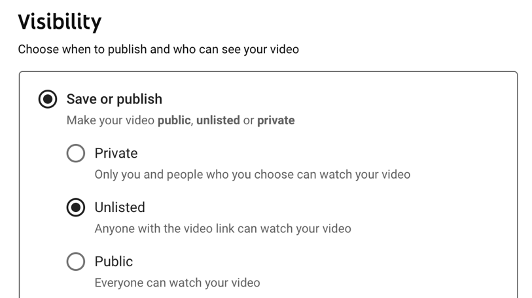
- Under visibility it is important to make sure you have selected it as Unlisted so we can download your video to your student file. Your video will NOT be publicly available. It is only available via the link provided. Do not click private as we cannot download.
- Once your video has finished uploading (you can check it’s progress at the bottom of the screen) select save.
- Once you see the Video published screen under Video Link select the below button to copy the link. Paste this link into the text box of the assessment submission in the appropriate subject area in the Learning Centre. Remember to click submit for marking!

EXCELLENT VIDEOS
If you produce an excellent video, we may utilise this as part of our training resources or provide it as an example for other students. In your Student Declaration you have given us permission to do this, but we will talk to you before we do use it.

DOs & DON'Ts OF VIDEO MAKING
DO
- Introduce yourself at the start of every video, and include the video number.
- Show us your 'cheat sheets' or any notes you have near by to refer to during your video. This removes any confusion about whether you have a script or not nearby.
- Pan down if you need to zoom in, so there is no doubt the footage is you.
- Feel free to pop your discussion points at the end of the video, freeing you up during the video to concentrate on the doing. Many students do this part at home, on the lounge.
- Have fun - we don't mind some giggles.
DON'T
- Read from a script - all this does is demonstrate your reading ability and not your veterinary nursing knowledge.
- Cut the video where we cannot tell it's you - we have to know it is you the entire time. If you want to zoom in on what you are doing, just pan down.
- Use voiceovers - we cannot confirm that it is you speaking, so we cannot use it as evidence. We need to see you speak at least for the majority of the video (the part's that are zoomed in are fine if we don't see you speak, as there is no cut in the audio and we can match your voice to earlier in your video).
- Use subtitles/text instead of discussions - subtitles or title slides are fine to separate out parts, but cannot be used to replace your discussions. We need to see and hear you so we can be 100% that it is you.
- Speed up your video - it's very hard for us to assess competency when you edit your video and speed up the footage. We have to verify that you can perform the task in an expected timeframe for someone competent at the task. Videos that are sped up will be returned to the student for resubmission.